

Plan a Little Sailor 1st Birthday Party
by Hostess with the Mostess
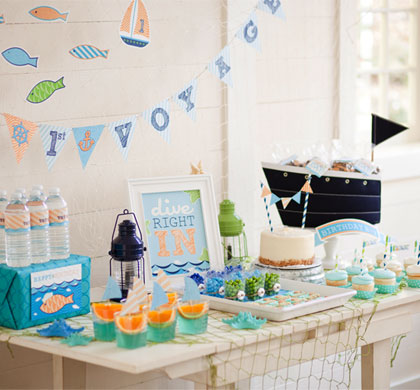
Your child's first birthday happens just once — make it unforgettable with a nautical–inspired celebration. This kid–friendly theme can work for boys and girls, just swap out the colors and add in a few bows for a more feminine touch. We styled the boy version with fish nets, lanterns and lifesaver embellishments. There are kid–sized paper plates cut to look like a cute little fish, an easy DIY sand–filled centerpiece for the adult table, and so many more creative ways to decorate, so let's dive right in!
THREE TO FOUR WEEKS BEFORE:
Decide on a location and time. This theme — which can be hosted inside or out — is perfect for summer. If you decide to host your party outdoors, make sure to scout out a shady spot for the sweets and the drinks table.
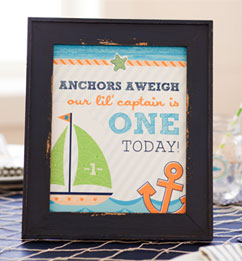
Plan the decorations. Our printable designs make it easy to give your party a professionally styled look. Download party signs, a playful "1st Voyage" banner and other fun designs, and use them as a guide for color and style when purchasing items for the party. Play up the sailor theme by
adding fish nets and painted starfish. Add decorative paper fish and sailboat silhouettes "caught" in the net.
Plan your menu. Make your sweets and drinks table extra inviting with a creative presentation! Display orange sailboats in cups of blue punch, with pattern paper sails. Label party favors with "Catch of the Day" tags. Add patterned paper bunting to a simple cake with a sugar "sand" base. Attach Life SaverTM candies and party flags to straws, as well as cupcake toppers and decorated sugar cookies lined on patterned paper.
Week of the Party:
Shop for food and desserts. Prepare what you can in advance to save time on the day of the party. If you're ordering anything from a bakery or caterer, now is the time to put in your order.
Decide on your sweets and drinks table setup. Determine the placement of your table and pick out the various serving dishes and containers you will need for dessert items. Be sure to create varying heights for the display table to add interest. Sturdy boxes covered in decorative paper or gift wrap are great for DIY risers.
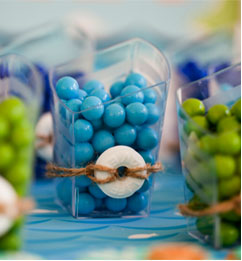
Prepare your decorations. Print and assemble any of the paper elements you are using for the shower, including party circles, drink flags and patterned paper (view all of the free downloadable templates for this party here). Assemble non–perishable foods and crafts that will serve as part of your display, like Lifesaver Cups and Washi Tape–embellished vases filled with sand. You can also fold napkins and cut out the fish plate shapes ahead of time.
Day of the Party:
Prepare food and desserts. Finish preparing any of the items you will be serving at the party. Set out and arrange all treats and drinks. Mix all ingredients for the Blue Punch ahead of time except for the club soda, which should be added to the punch immediately before serving.
Decorate for the party. Set the kids
table with Fish Place Settings and Orange Ship Drinks, and decorate chairs with DIY sailor hats made from coffee filters. Add stylish forks, napkins and sparkly blue gift wrap table runners for extra party magic. Attach drink flags to striped straws and display printable party signs in white or nautical–inspired frames. Mix and set out drinks right before the party starts.
